Most fig varieties area easy to root. By rooting the cuttings from the mother plant, you can obtain the genetically identical fig trees from the mother fig tree. Here is how I root the cuttings either purchasing the cuttings from auctions or from my own fig tree.
- Rinse the cutting with water (Sometimes I use an old tooth brush if it’s extremely dirty).
- Spray the cuttings with hydrogen peroxide. I used the stored bought 3.5% hydrogen peroxide (I has also tried 10% bleach but I don’t like the smell of it. It’s more toxic and I don’t like mixing either.). I don’t rinse it afterward since the hydrogen peroxide will break down into water the oxygen. It’s harmless to the cutting. Just make sure the the cuttings are properly sanitized. Spray the garden shear and grafting knife with hydrogen peroxide too.

Hydrogen Peroxide - Let the cuttings and gardening tools air dry.
- Prepare the rooting container: I use clear cup so I can clear see the root development. The size of cup are any where from 16 oz to 32 oz but no smaller. The largest clear cup from Walmart is 16 oz. I have to buy clear cup from internet if I use larger cut. The deli container work well too. The hold can either drilled or cut the edge of the bottom with a pair of scissors.
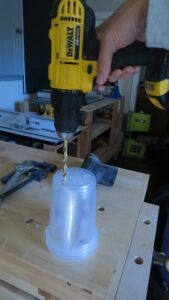
Drill holes

32 oz vs 24 oz vs 16 oz

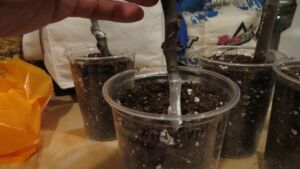
Labeling the Cups - Prepare the rooting media: I use 50% Pro Mix Bx (contains 85% peat moss), 25% find pine bark and 25% (The recipe is modified from Brian M who sold me the Burgan Unk cuttings. His recipe is 50 peat moss, 25% pine pine bark and 25% perlite). I typically root multiple cuttings at the same time. If I want to root four cuttings, I will use the 2 cups of Pro Mix Bx, 1 cup of fine pine bark and 2 cup of perlite)
- Mix all three ingredient. I also mixed in some water if the media is too dry.
- Scope the rooting media into the cup. Use a stick to poke a hole in the rooting media. This is where I will insert the cutting into. I typically put the hole closer to the edge rather than the center so I can see the root easier. Some people say that it’s quicker to root the cuttings on the edge but I am not sure whether this is true.

Make a hole on the rooting media with a stick - One the cutting is try, wrap the tip of the cuttings with parafilm.
- Cut the cuttings 1/4 inch below a node in a 45 degree angle on the bottom end
- Use the scrape two half inch lesion with the grafting knife on the cut end
- Apply rooting hormone to the bottom end, I have used powder and gel form. They work equally well.

Rooting Hormone - Insert the cutting into the rooting media. I make sure that the bottom is about 1 inch away from the bottom (Some suggest two inches but that’s for 4 x 4 x 9 inch tree pot. The clear cup is much shorter.)
Insert Cutting into Rooting Media - Water the cutting with half strength fertilizer

Watering Cutting with half strength liquid fertilizer - Leave the cuttings in the dark part of the room.
- Leave the cuttings alone for a month (I occasionally check the cutting by lifting the cup up. I only water the cuttings if the cup is very light and no visible water condensation of the wall.)
- Move the cuttings to the bright side of the room after extensive root growth and the leave are budding. I will leave the cuttings in the dark part if it has very little root growth.

On the picture is my guest room where it has sunny size where the windows are, the other size is darker. I start the cutting at the darker side of the room.
The following are optional:
-
- Cover the cuttings or enclose the cuttings in a container to minimize the water lose
- Rooting hormone in step # 12
- Heating mat (only need it if growing indoor when the temperature is less then 70 degree). Sometime, I put a layer of carboard between heat mat and the container. This will diffuse the heat from the heat mat.
How to root fig cuttings